Building and configuring OpenCV in Visual Studio 2015 with source code mapping


OpenCV is a free library for computer vision containing an extensive number of algorithms related to computer vision problems. In its native form, it is a C/C++ library, although, ports to other languages (e.g. Python) are available. Good introductions to the computer vision field with OpenCV are offered in the official documentation (look out for the tutorials) or in the corresponding book written by the authors of the library itself. Getting started is pretty easy since pre-built binaries are available. Nevertheless, in this article, I want to describe how to get your own build of the OpenCV library.

So, why the effort of creating an own build? Well, while the official builds are great to begin, they lack unfortunately of the debug information from the build process. Especially, they do not contain the PDB files created during the build process. These are especially useful because of the mapping between the binaries of the library and the original source code. Usually, when you link your code against some library (e.g. statically linking against a .lib during compile time or including a .dll during runtime on Windows) you link only against the compiled machine code. This is great for performance but not so great if errors occur and you want to look up in the original source code the identify the problem. This is where PDB files help out. They contain (among others) the mapping between the machine code and the original source line which produced the machine code. With this information, it is possible to step through the original source code during debugging in Visual Studio. This is useful for all libraries, but especially with OpenCV since they like to use assertions (which is great) and so it might happen that your application crashes with some cryptic message which shows the original failing code. The assertion code is much more useful when you see the surrounding context (including stack trace, variables, etc.) which produced it.

That being said, I want now give an instruction of how I create my builds including debug information. Unfortunately, PDB files contain only the absolute path to the original source code by default. Even though it seems that this can be changed later in Visual Studio (I have never tested it myself), it would be advisable to use the same paths as in the following build instruction in order to get the source mapping working out of the box. Another caveat is that Visual Studio has a predefined mechanism where to search for PDB files which belong to a loaded DLL. Even though it should look in the directory of the DLL itself, this did not work for me. But it does look in the folder of the original location of the DLL (e.g. where the DLL is first stored to)1. Therefore, is important to make sure the DLL files are stored directly in the installation directory. Again, this is also something you can change during debugging in Visual Studio itself but I would rather prefer an out of the box solution.

Building

  1. First, get a copy of the latest master branch. I would recommend to store also the latest commit ID and save it in an appropriate text file (version.txt) for future reference
  2. Create the following folder structure (I downloaded the sources as zip file)
            
            C:/OpenCV
            |-- build
            |-- cmake_build
            `-- sources
                |-- opencv-master
                |-- opencv-master.zip
                `-- version.txt
            
            
    The build folder is the installation directory where the created binaries will be stored. cmake_build contains all the files created and needed for building. The folder sources/opencv-master contains the source code from the git repository (which is also the folder referenced by the PDB files)
  3. Open cmake-gui.exe and set the paths CMake paths
  4. Press Configure. A window opens where you need to specify the target toolset (i.e. the compiler toolset of the Visual Studio version). In my case, I build with Visual Studio 2015 for the x64 architecture, therefore, selecting Visual Studio 14 2015 Win64 CMake toolset
  5. After this step, you see all the options (which are all read) you can configure your own build process. I changed only the following entries and left the rest on default
            
            BUILD_DOCS --> OFF                           // I don't need the documentation since I look it up online anyway (or look directly in the header files)
            BUILD_EXAMPLES --> ON                        // Examples are quite useful to get a first impression of an algorithm
            BUILD_opencv_world --> ON                    // This builds a unified DLL containing the machine code for all modules. This is easier for deploying since only one file needs to be located alongside the executable, but also increases the size of the application directory due to the (unnecessary) code of unused modules. Personally, I am currently fine with only one DLL
            ENABLE_AVX --> ON                            // This and the following entries enable the use of special processor instructions which should speed up performance. But make sure your processor supports them!
            ENABLE_AVX2 --> ON
            ENABLE_FMA3 --> ON
            ENABLE_SSE41 --> ON
            ENABLE_SSE42 --> ON
            ENABLE_SSSE3 --> ON
            WITH_OPENCL_SVM --> ON                       // This enables the use of shared virtual memory in OpenCL programming. Not sure if I really need that but sounds great to use it^^
            CMAKE_INSTALL_PREFIX --> C:/OpenCV/build     // This is actually very important. It specifies where the resulting binaries should be installed to after compilation. Without this option, an install folder would be created inside the cmake_build folder. But since the resulting binaries should be placed inside the build folder, this would require to manually copy them. And this again breaks the default PDB loading mechanism described above
            
            
    General note: make sure you use only the forward slash (/) in path attributes
  6. Press Configure again. If everything went well, no red entries should be left
  7. Now press Generate which places the Visual Studio solutions to the cmake_build folder
  8. Open the solution cmake_build/OpenCV.slm with Visual Studio (wait until the analysation steps are done)
  9. Make sure that the solution ALL_BUILD is selected as the main project and build it twice, once in release and once in debug mode
  10. If the build step was successful, mark the solution INSTALL as the main project and build it also in release and debug mode (no re-build necessary). This step fills the build folder
  11. Copy the file cmake_build\bin\Debug\opencv_world320d.pdb to the folder build\x64\vc14\bin so that you get the mapping to the OpenCV source files
  12. Copy the test module's files from cmake_build\lib\Debug\opencv_ts320d.lib and cmake_build\lib\Release\opencv_ts320.lib to the folder build\x64\vc14\lib. They seem to be necessary but not copied by the installation step itself for some reasons
  13. If you like, you could archive the cmake_build folder and delete it afterwards to save space on the disk. I would not delete it completely since you may need some of the build files again in the future

Configuring

If everything proceeded without errors, you have now your own build of the OpenCV library. But to use it, you first should configure your system properly. Including a library involves two steps:

  • You have to put the header files to the project's include directory so that you can access the interface of the library
  • And you must link against the compiled code. Since I want to link dynamically using the produced DLL files, this step is comprised of two additional steps
    • The compiled library code resides in DLL files. In order to load the contained code during runtime, the libraries must be available to the application. Windows searches for libraries in the directory of the application itself and (if the DLL is not found) in all directories which are set in the PATH variable. Because I do not want to copy the DLL files to each application's directory (including the OpenCV examples), I decide for the PATH variable approach. In this case, all applications on the system use the same DLL. But this also means that the PATH variable needs to be adjusted
    • Creating a DLL involves also the creation of a corresponding LIB file. This is not the same as the LIB file which would be produced when linking completely statically to the library. It is much smaller and contains only the information needed to load the corresponding DLL file during runtime. But, the application which depends on a DLL file must link statically against the produced LIB file in order to properly resolve the dependency during runtime. So, the library directory and the library dependency needs to be added to the application

To simplify the steps, it is advisable to work with an additional system variable which points to the build directory. In the build configuration, we can then refer to the variable instead of the concrete hardcoded path. If the path to the build directory needs to be changed ever again in the future, only the system variable needs to be adjusted. To create a system variable named OPENCV_DIR which points to the directory C:/OpenCV/build open a command prompt with administrative privileges and run the following command


setx -m OPENCV_DIR C:\OpenCV\build

Next, we want to use this system variable to extend the PATH variable with an additional entry pointing to the folder containing OpenCV's DLL files. They are located in C:/OpenCV/build/x64/vc14/bin (x64 architecture and built with Visual Studio 2015), so the following command will do the job (re-login to Windows or kill and re-create explorer.exe in order to apply the changes)


setx PATH "%PATH%;%%OPENCV_DIR%%\x64\vc14\bin" /M

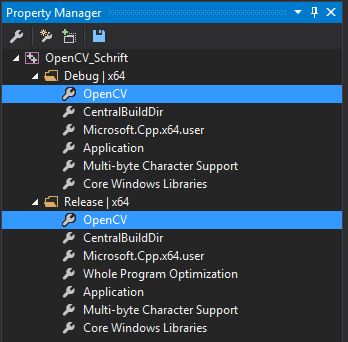
The settings for the include directory and static library linking are project specific and must be set for each project individually. To simplify the process in Visual Studio, I would suggest using a property sheet. This is an XML file which contains the necessary settings for the compiler and linker. They can then be easily added to Visual Studio in the Project Manager and all settings are configured.

Project Manager in Visual Studio
Figure 1: Project Manager in Visual Studio.

In our case, the following property sheet would be appropriate:


<?xml version="1.0" encoding="utf-8"?>
<Project ToolsVersion="4.0" xmlns="http://schemas.microsoft.com/developer/msbuild/2003">
  <ImportGroup Label="PropertySheets" />
  <PropertyGroup Label="UserMacros" />
  <ItemDefinitionGroup>
    <!-- Include directory -->
    <ClCompile>
      <AdditionalIncludeDirectories>$(OPENCV_DIR)\include;%(AdditionalIncludeDirectories)</AdditionalIncludeDirectories>
    </ClCompile>

    <Link>
      <!-- Library directory -->
      <AdditionalLibraryDirectories Condition="'$(PlatformToolset)'=='v120'">$(OPENCV_DIR)\$(Platform)\vc12\lib;%(AdditionalLibraryDirectories)</AdditionalLibraryDirectories>
      <AdditionalLibraryDirectories Condition="'$(PlatformToolset)'=='v140'">$(OPENCV_DIR)\$(Platform)\vc14\lib;%(AdditionalLibraryDirectories)</AdditionalLibraryDirectories>
      <AdditionalLibraryDirectories Condition="'$(PlatformToolset)'=='v141'">$(OPENCV_DIR)\$(Platform)\vc141\lib;%(AdditionalLibraryDirectories)</AdditionalLibraryDirectories>

      <!-- Library files -->
      <AdditionalDependencies Condition="'$(Configuration)'=='Debug'">opencv_ts320d.lib;opencv_world320d.lib;%(AdditionalDependencies)</AdditionalDependencies>
      <AdditionalDependencies Condition="'$(Configuration)'=='Release'">opencv_ts320.lib;opencv_world320.lib;%(AdditionalDependencies)</AdditionalDependencies>
    </Link>
  </ItemDefinitionGroup>
</Project>

As you can see, it is also possible to reference the OPENCV_DIR system variable. Conditions are used to check for different toolsets (i.e. Visual Studio versions) respectively the current build configuration. $(Platform) evaluates to the target architecture name, e.g. x64 or x862.

The AdditionalIncludeDirectories tag adds an additional path for the include directory which makes sure the compiler knows where to locate OpenCV's header files. This lets you write something like #include <opencv2/core.hpp> in your code. AdditionalLibraryDirectories adds an additional directory to linker where it searches for library files which are references in the library files section by the AdditionalDependencies tag.

You now have everything you need for your first project in OpenCV. If you do not want to write your own, you can also check out my test project for this blog article on GitHub. I attach also the binaries from my build process. If you make sure to keep the directory structure from above, you can use OpenCV with source mapping out of the box.

List of attached files:


1. Let's look at an example to make this a little bit clearer. If you have a DLL named opencv_world320d.dll which was build in the directory called C:/OpenCV/cmake_build/bin/Debug (3), installed to the directory C:/OpenCV/build/x64/vc14/bin (2) and used by an application which resides in the directory C:/myApplication (1) Visual Studio will look for a PDB file called opencv_world320d.pdb in each of these directories with the numbers in brackets as search order. (2) is the one which matches in our case.
2. As a general hint: if you want to know which variables are available, you can also edit the project configurations in Visual Studio directly. If you click on the Macros button in any setting, all available variables together with their current evaluated value are shown.

C++ class for easy parallelization of for loops


When a program needs to run faster by using more CPU cores, it is quite common to start with the parallelization of for loops. In this case, the execution of the loop is separated to multiple threads, each working on a part of the original loop. If for example an array with 24 elements needs to get processed and 12 system cores are available, each thread could process two consecutive elements (first thread 1 and 2, second thread 3 and for and so on). Of course, other constellations are also possible. For this purpose, it is common to have a parallel_for loop in a multithreading library (e.g. in Intel®'s TBB library). I wrote my own version just using C++11, which I want to introduce in this article. First I start with some basic (personal) requirements for such a function and then show some working code (tl;dr view the source directly on GitHub).

Whenever I needed to parallelize some loop, the basic problem is quite similar: I have some data structure containing some elements. Each element needs to get (expensively) processed and the result stored in a shared variable. For example, a list of images where each image is processed individually producing some feature data as output. All outputs are stored in the same variable. It might also be useful to output some status information to the console during execution. This makes it necessary to a) schedule the execution to multiple threads and b) make sure that the threads don't interfere when storing the results to the shared variable or writing something to the console. The situation is also illustrated in the following figure.

Figure illustrating the here discussed requirements for parallelization tasks
Figure 1: Overview of the general problem often faced in parallelization tasks.

As the figure suggests, special care is necessary at two points: storing the result and print something to the console. It is assumed that the processing task itself is already thread-safe (it can be unproblematically executed multiple times from within several threads at the same time interval). Of course, this comes not for free and may need special treatment. But this should not be of interest at the current abstraction level.

To ensure the thread-safety a std::mutex is used together with a std::lock_guard. A mutex is a way of concurrency control to ensure controlled behaviour over critical parts of the code1. For example, if it should be ensured that a function will only be executed from one thread at the same time because the code inside the function writes to some variable and if multiple threads would do this at the same time, it would get messy. A mutex helps with this kind of scenarios. Whenever a thread A enters the function it locks the mutex. If the mutex is free (no other thread locked before), the current thread takes control over the mutex. If now an additional thread B enters the same function while thread B still processes it and tries also to lock it, then thread B has to wait until thread A is ready. The “readiness” is signalled through an unlock of the mutex at the end of the function. The unlocking also invokes a signal process which informs thread B that it can now proceed further. The used lock-guard ensures this procedure of lock and unlock automatically, by locking the mutex inside the constructor and unlocking it inside the destructor (the great RAII concept). The lock-guard object is created at the beginning of the function on the stack.

In its heart, there is the parallel_for() function which replaces the standard for-loop. The idea is to give this function a range of indices which need to get processed and the functions divides this range into several parts and assigns each thread one part (like the situation illustrated in the figure where indices 3 and 4 get assigned to Thread 2). Then all threads are started each processing the elements corresponding to their assigned indices.

This all said, it is now time for some code. I will only cover the client usage side. The (documented) class together with a test project is available on GitHub. The class is named ParallelExecution and offers three basic methods, which are all covered in the following example (from the test program). The only constructor parameter is the number of threads to use (if not otherwise explicitly specified). If omitted, it defaults to the number of available system cores (virtual + real).


std::deque<double> parallelExecution(const std::deque<double>& inputA, const std::deque<double>& inputB)
{
    /* Note: the code is just an example of the usage of the ParallelExecution class and does not really cover a useful scenario */

    assert(inputA.size() == inputB.size() && "Both input arrays need to have the same size");

    ParallelExecution pe(12);                                        // Number of threads to use, if not otherwise specified

    std::deque<double> result(inputA.size(), 0.0);
    pe.parallel_for(0, iterations - 1, [&](const size_t i)           // Outer for loop uses as much threads as cores are available on the system
    {
        pe.parallel_for(0, result.size() - 1, [&](const size_t j)    // Inner for loop uses 2 threads explicitly (the parallelization at this point does not really make sense, just for demonstration purposes)
        {
            const double newValue = (inputA[j] + inputB[j]) / (i + j + 1);

            pe.setResult([&] ()
            {
                result[j] += newValue;                               // Store the result value in a thread-safe way (in different iterations the same variable may be accessed at the same time)
            });
        }, 2);

        pe.write("Iteration " + std::to_string(i) + " done");        // Gives a threads-safe console output
    });

    return result;
}

There are basically 3 methods which cover the so fare discussed points:

  • parallel_for(idxBegin, idxEnd, callback, numbThreadsFor [optional]): this is the most important methods since it replaces the otherwise used for (int i = 0; i < input.size(); i++) loop. It gets the range of consecutive indices and a callback function. This function will be called from each thread for each assigned index (parameter i). To stick with the example from the figure, Thread 2 would call the callback two times, once with the parameter 3 and once with 4. Last but not least, it is possible to specify the number of threads which should be used for the current loop as an optional parameter. If omitted, the number given in the constructor will be used.
  • setResult(callback): covers the bottom part of the figure. After the data is calculated it should be stored in the shared result variable by ensuring thread-safety (internally done by using a mutex).
  • write(message): covers the right part of the figure to output to the console in a thread-safe way, so that different messages from different threads don't interfere. Internally, this is also done by using a mutex. It is a different one compared to the one used for setResult() though since it is no problem when one thread accesses the result variable and another thread writes to the console window at the same time (non-interfering tasks).

1. There is, of course, also a stackoverflow question which covers the basic idea.

Project references in Visual Studio and C++


Especially when projects get larger, some kind of modularization is needed. In native projects, this is normally done by splitting the code base into several libraries. If all libraries are Visual Studio projects, there is the option to use references to other projects, which I want to examine in this article. The test project files I used can be found on Github.

To use the code from another project, the other project has to be built as a static or dynamic library. Here, I will only focus on static libraries. On Windows, this produces a *.lib file which the client can link against. As an example, consider a Visual Studio solution with a project named ParentProject (normal project with a main()-method) and two child projects Child1Project and Child2Project. Both child projects are built as static libraries. In this test case, the following should be achieved:

Example of project dependencies with two internal (Child1Project and Child2Project) and on external (ImageLibrary) library
Figure 1: Example of project dependencies with two internal (Child1Project and Child2Project) and one external (ImageLibrary) library. All libraries are static.

To use the code from a child project in the parent project two things need to be done:

  1. The path to the header interface files of the child project needs to be added to the include path of the parent project.
  2. The resulting *.lib files must be added as input libraries to the linker in the parent project.

The first step must be done manually by adding the appropriate path to the project settings from ParentProject. E.g. by adding the paths to Project propertiesVC++ directoriesInclude directories.

For the second step, there is an easier way in Visual Studio if the other project is also a Visual Studio project (and not some normal *.lib file). This is where the aforementioned project-to-project references find a use. In Visual Studio, they can be set by right clicking on the References entry of the ParentProject and then select Add reference which opens a new window where you can select the child project. After this step, the parent project automatically links against the resulting *.lib files from the child project. The reference entry for the parent project should look similar to the following screenshot.

Project references in Visual Studio
Figure 2: Project references in Visual Studio. Three references (Child1Project, ImageLibrary and Child2Project) were added to the ParentProject. Screenshot from Visual Studio 2017.

The code is used from a child project as usual: include the appropriate header file in the parent project (using #include <header.h>) and use the functions/classes.

The child projects mentioned before were all created from within the same solution. But sometimes, it is also necessary to include code from another project, like an existing module. It would also be cool to make the process a little bit easier (e.g. don't add the include path and the project reference manually all the time).

In this example an external project named ImageLibrary should be included (see figure above). To make things easier, I prepared an ImageLibrary.props file for this library which looks like:


<?xml version="1.0" encoding="utf-8"?>
<Project ToolsVersion="4.0" xmlns="http://schemas.microsoft.com/developer/msbuild/2003">
  <ImportGroup Label="PropertySheets" />
  <PropertyGroup Label="UserMacros" />

  <!-- Include path -->
  <PropertyGroup>
    <IncludePath>$(MSBuildThisFileDirectory);$(IncludePath)</IncludePath>
  </PropertyGroup>

  <ItemDefinitionGroup />
  <ItemGroup />

  <!-- Project reference -->
  <ItemGroup>
  <ProjectReference Include="$(MSBuildThisFileDirectory)\ImageLibrary.vcxproj">
    <Project>{DD9F7D1D-B22C-4B88-8167-7F1884709C19}</Project>
	<UseLibraryDependencyInputs>true</UseLibraryDependencyInputs>
  </ProjectReference>
  </ItemGroup>

</Project>

The variable $(MSBuildThisFileDirectory) holds the path to the directory of the property sheet file. So, the first thing is that the directory of the property sheet is added to the include path. This must, of course, fit to the folder structure. Secondly, the project reference to the project ImageLibrary is added. In this case, it is also necessary to add the ProjectGuid in addition to the path, which I just copied from the ImageLibrary.vcxproj file (ID which will be automatically created from Visual Studio for each new solution).

To use the ImageLibrary project from the ParentProject two things need to be done:

  1. Add the ImageLibrary project to the solution. This can be achieved by right clicking on SolutionAddExisting project.
  2. Add the ImageLibrary.props file to the parent project (this step adjusts the include path and the project reference). This can be done in the Property Manager.

There are two steps because the first adjusts the solution file and the second the project file.

Compile qt's db2 sqldriver (QDB2)


Qt offers a great abstraction to connect to different databases (MySQL, SQLite, etc.). For each database a driver is required which handles the communication with the database system. In Qt, the drivers are located at plugins/sqldrivers (in the directory of the Qt version). For some databases there are already some pre-compiled drivers available (e.g. qsqlmysql to connect to a MySQL database). Unfortunately, IBM's DB2 is not on that list, so it needs to be compiled manually. In this article, I want to show the corresponding building instructions.

I use Qt 5.7.1 and IBM's DB2 Express-C edition at version 11.1. To build the driver you need the sources for Qt. They can, for instance, be fetched with the maintenance tool (Add or remove componentsQt 5.7 → check Sources). Here, I am building the driver with Visual Studio 2015 Update 3 (using the compiler for the 64 bit target architecture) on a machine with Windows 10 x64 installed. The following paths are used:

  1. C:\Qt\5.7\msvc2015_64\bin: location of the build tool qmake
  2. C:\Qt\5.7\Src: location of Qt's source code (default location when the sources are fetched with the maintenance tool)
  3. C:\Program Files\IBM\SQLLIB: location inside IBM's install directory where the sql library is located

If you use different paths, adjust them accordingly in the following build instructions.

  1. There is a bug in Qt 5.7.1 (which seems to be fixed in Qt 5.8.0) so that the sources need to be adjusted. Open the file C:\Qt\5.7\Src\qtbase\src\sql\drivers\db2\qsql_db2.cpp and change the lines 1190 and 1191 to
            
            d->hEnv = reinterpret_cast<SQLHANDLE>(env);
            d->hDbc = reinterpret_cast<SQLHANDLE>(con);
            
            
  2. Open the Visual Studio command line prompt (e.g. VS2015 x64 Native Tools Command Prompt) with administration privileges
  3. cd to the directory C:\Qt\5.7\Src\qtbase\src\plugins\sqldrivers\db2
  4. Run the command C:\Qt\5.7\msvc2015_64\bin\qmake "INCLUDEPATH+=C:/progra~1/IBM/SQLLIB/include" "LIBS+=C:/progra~1/IBM/SQLLIB/lib/db2cli.lib"
    1. Adjust the path, if you have installed DB2 to a different directory
    2. Make sure you replace Program Files with progra~1 (otherwise there might be some problems due to the space)
  5. Run nmake to build the library. There might be some warnings, but it should work nevertheless. If successful, the produced libs should be located at C:\Qt\5.7\Src\qtbase\plugins\sqldrivers
  6. Run nmake install so that the produced libs will be copied to C:\Qt\5.7\msvc2015_64\plugins\sqldrivers
  7. Start Qt Creator, open the sqlbrowser example project, build and run it. If successful, you should now be able to select the QDB2 driver from the list and connect to your database

If the application is started from inside Qt Creator, the dynamic libraries are automatically loaded, if they are located in C:\Qt\5.7\msvc2015_64\plugins\sqldrivers (this is also true for the other libraries in the plugins folder). When you deploy your Qt application, you need to make sure that the dynamic library qsqldb2.dll is located in a folder named sqldrivers alongside your application's executable, i.e. a directory structure like:


ApplicationFolder
|-- sqldrivers
|   `-- qsqldb2.dll
|-- Application.exe
`-- <<other stuff>>

This process can be automated by using the Windows Deployment Tool.